 |
| Expert |
 |
Joined: Sat Dec 04, 2010 3:42 pm
Posts: 519
Location: Qualicum Beach, BC
|
|
HI George
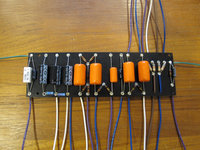
I would run the jumpers on the bottom of the board. It would be kind of messy to run them on the top. Running the jumpers on the top works if they all line up along the edge of the board. But these would end up running underneath some of the resistors and capacitors if they are on the top. The flying leads can go on the top if you want.
Don't twist or crimp any wires in the eyelets. You want them easily removable if you have to work on the amp in the future. Just run the wires through the eyelets and bend them over a bit on the other side to help hold them in place while you solder. Don't solder an eyelet until all the wires, resistors and capacitors going there are in place. You can trim the excess lead length fairly flush to the board, too.
Pictures of the top and bottom of the board in my Tweed are attached. Note that one eyelet is not yet soldered because that's where the output transformer's center tap wire will attach. You can see how I've bent the leads there over a bit to hold the resistor and capacitor in place and I've also trimmed them fairly flush. That's how the wires are at all the eyelets.
Eyelet board wiring is easier than it seems. You will get the hang of it pretty fast.
| Attachments: |
BoardTop.jpg [ 299.39 KiB | Viewed 6431 times ]
|

BoardBottom.jpg [ 287.5 KiB | Viewed 6431 times ]
|
|
|


