trinityamps.com

Trinity Amps Guitar Amp Forum
It is currently Thu Jul 18, 2024 5:30 am

All times are UTC - 5 hours [ DST ]


Post new topic Reply to topic  [ 7 posts ] 
Author Message
 Post subject: tolex woes
PostPosted: Tue Dec 04, 2007 4:04 am 
Offline
Novice
Novice

Joined: Thu Jul 06, 2006 5:43 pm
Posts: 54
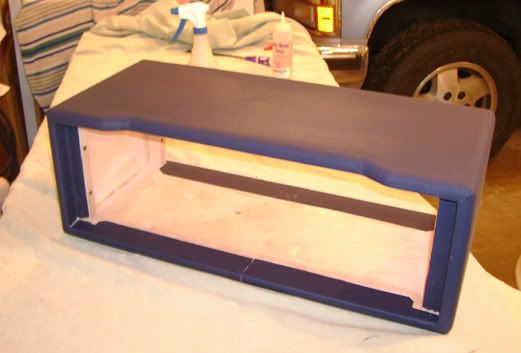
So I decided to start the tolex on my lightning cab tonight. I figured I'd do the one seam on the bottom version of the build. I figured that I would cut the tolex long so I could just trim the edges once with a sharp blade. Unfortunately my blade wasn't sharp enough and it got screwed up. Needless to say the edge got trimmed too short and I'm screwed. I also got some glue on the vinyl.

Anyway, I'm going to restart again tomorrow after I sand the glue off the head. Any advice on how to get that seem to match up? Should I cut it perfectly before glueing or should I glue it most of the way and the cut a bit off each side until they meet perfectly and then reglue?

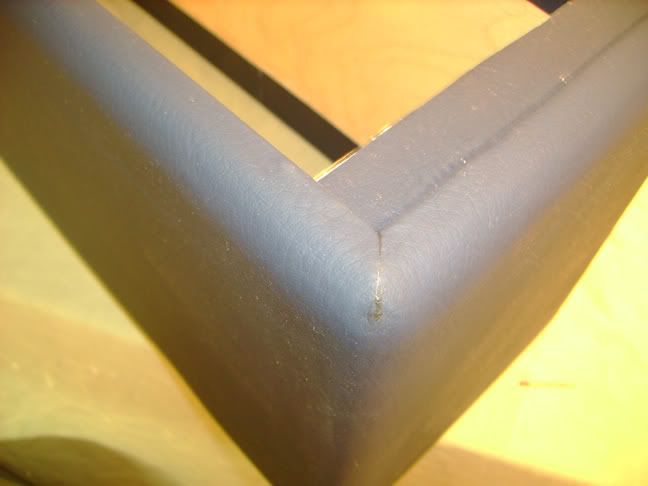
Also I used to the screwup to work on my corner technique. I'm using Casey's tutorial

http://s238.photobucket.com/albums/ff24 ... %20Corner/

as a guide. Unfortunately his guide cab does not have th half inch radius on the corners. Does anyone have some pointers on how to adapt Casey's technique to the rounder corners of the half inch radius?

Thanks,

Eric


Top
 Profile  
 
 Post subject:
PostPosted: Wed Dec 05, 2007 2:05 pm 
Offline
Novice
Novice

Joined: Thu Jul 06, 2006 5:43 pm
Posts: 54
Ahhh, a little practice on the corners and it looks like that's figured out.

The following is for those who may be contemplating an attempt at tolexing. I simply want to share my struggles for future readers.

Getting the seam right on the bottom of the cab was giving me worries. I didn't want to screw it up a second time because then I wouldn't have enough to cover my cabinet. I alligned the right side of the tolex so it would lay exactly where I wanted the seam and left a couple of inches of extra tolex on the left side so it would overlap. My plan was to cut down the left side of the tolex bit by bit until it matched the right. unfortunately I screwed up and rolled the glue all the way to the end of the left flap. I manage to remember to leave the right side free of glue. I did not want to leave glue residue on the vinyl of the right flap so I layed the left flap down and then layed the unglued right flap on top of it.

As I tried to figure out how to cut a perfectly matching seam I arrived on an idea. What I ended up doing was using a couple of pieces of masking tape to secure the pieces and then placing a razorblade parallel against the side of the overlapping piece. I used a hammer to tap the top of the blade so it pierced the underlying layer. This made a perfectly straight cut right along the seam the length of the razorblade. Then I simply moved the blade up a length and repeated the process. The result was a perfectly cut matching seam. I'm sure I marked up the bottom of the cab a bit with the blade but since it's going to be covered......

After the cut was made all the way across I simply picked up the right flap, removed the cut off material from the left flap and layed them both together to make sure they really did fit. Then I used superglue under each flap the length of the seam so that I could be sure the seam would stay together while the rest of the glue on the cab dried. I also used some masking tape to help. I left the cab to dry overnight. Hopefully when I look at it today the seem will still be perfect and the rest of the glue dry enough to do the corners.

There's an update for any that are interested. When I cover the cab I will probably take some pictures to illustrate what I did.


Top
 Profile  
 
 Post subject:
PostPosted: Wed Dec 05, 2007 9:30 pm 
Offline
Holy Ghost
Holy Ghost
User avatar

Joined: Sun Mar 13, 2005 4:10 pm
Posts: 7519
Location: Canada
Seam -
1. Glue one side down.
2. The glue the other side down but overlap the two pieces.
3. Cut perpendicular and away from both the cabinet edges where you want the seam.
4. Take a ruler along the overlay part, line it up with the perpendicular cuts on each side of the cabinet and cut with a sharp knife pressed hard. 5. Then remove the excess, and push the seams to butt against each other.
You get some glue on the Tolex, but you can rub that off.

Corners -
1. cut the material perpindicular from where it wraps around the corner.
2. carefully extend the cut onto the cabinet area where the mitre will end
3. fold one 'flap' over and cut along the inside edge into the inside edge corner
4. cut from that point to where you extended the cut onto the cabinet area where the mitre will end
5. repeat for other flap.
You are left with a cutout in the material you can glue up.
I trim any excess or overlap at gluing time.

It's hard to follow. I should You Tube it!

_________________
Stephen
Web: www.trinityamps.com. Facebook: facebook.com/trinityamps. Twitter: @trinityamps


Top
 Profile  
 
 Post subject:
PostPosted: Sat Dec 08, 2007 1:49 am 
Offline
Novice
Novice

Joined: Thu Jul 06, 2006 5:43 pm
Posts: 54
Here are a couple of pics of what I have so far. What do you guys think?

Outer head covering. Ignore the bottom seam. For some reason the light is reflecting funny. Doesn't look bad at all in real life.
Image

Here's an example of my work on a corner. I got a little overzealous with the sharpie when I was marking it so that is why you see a little black. I think I can clean that off though. If not it will be covered by my corner protectors.

Image


Top
 Profile  
 
 Post subject:
PostPosted: Sat Dec 08, 2007 8:49 am 
Offline
Holy Ghost
Holy Ghost
User avatar

Joined: Sun Mar 13, 2005 4:10 pm
Posts: 7519
Location: Canada
Pretty darn good. Try sparingly "Goof Off" to clean off the marker, or even the less strong "contact cement" cleaner. Test a small patch on the bottom to make sure the color isnt affected.

Corners are very good. Too bad the matal corners are covering them up.

How did you find doing the top, front edge?

_________________
Stephen
Web: www.trinityamps.com. Facebook: facebook.com/trinityamps. Twitter: @trinityamps


Top
 Profile  
 
 Post subject:
PostPosted: Sat Dec 08, 2007 1:10 pm 
Offline
Novice
Novice

Joined: Thu Jul 06, 2006 5:43 pm
Posts: 54
The top front edge was difficult and I really had to think in order to proceed. I ended up making a couple of ugly relief cuts in the vinyl where I thought the strain of the curve could be eased. When the contact cement was tacky enough I used a small bit of superglue in the innermost part of the curve just to keep that part down while I stretched over the rest. I found a blow dryer to be helpful when trying to make the curve. I found I had to make a pleates (sp?) towards the outside edge which were shaved off when the glue was dry. If you look at the underside it's kind of ugly but it covers what needs to be covered when the amp is in place. I'll take a pic of the edge so you can see.


Top
 Profile  
 
 Post subject:
PostPosted: Sat Dec 08, 2007 1:36 pm 
Offline
Holy Ghost
Holy Ghost
User avatar

Joined: Sun Mar 13, 2005 4:10 pm
Posts: 7519
Location: Canada
That top edge take a lot of practice but I'm sure if you did it again, you'd do an even better job. A lot of relief cuts required in there!

_________________
Stephen
Web: www.trinityamps.com. Facebook: facebook.com/trinityamps. Twitter: @trinityamps


Top
 Profile  
 
Display posts from previous:  Sort by  
Post new topic Reply to topic  [ 7 posts ] 

All times are UTC - 5 hours [ DST ]


Who is online

Users browsing this forum: No registered users and 6 guests


You cannot post new topics in this forum
You cannot reply to topics in this forum
You cannot edit your posts in this forum
You cannot delete your posts in this forum
You cannot post attachments in this forum

Search for:
Jump to:  
Powered by phpBB® Forum Software © phpBB Group