Since there is some interest in seeing details of a Hiwatt-inspired amplifier I built several years ago, here we go. I considered Trinity's Triwatt kit. My first tube amp project was a Trinity TC-15 that I built a year earlier, so I knew their kits are first rate. But for my second tube amp I wanted to see if I could faithfully reproduce an early 1970s 50-watt DR504 and a Triwatt is a bit small for that.
Hiwatt was founded in England around 1967 by Dave Reeves who worked for Marconi and Mullard before starting his own company. He designed the amplifiers and in the early days, he even built them himself to very meticulous standards. When Hiwatt amplifiers started to catch on with some of the big names in British rock music, business picked up and Reeves had to contract out the assembly work to meet demands. He chose Harry Joyce Electronics. Harry Joyce and his staff also did work for the British Navy so they were well acquainted with neat military-spec wiring and were a good fit to carry on Reeves' high standards.
I tried to maintain these standards when I built my 504. I got the parts from a small company in Indiana that was called Vintage Hiwatt Restorations (VHR). At the time, as their name implied, they sold parts to restore vintage Hiwatts. This included transformers they had specially made by Heyboer to closely match the originals made by Partridge, and some very nice reproduction cabinets.
This was in early 2011. Since then, VHR has stopped selling parts. Now, under the name Hi-Tone Amplification and with the permission of the Reeves family, they just sell finished amplifiers that are very faithful reproductions of original Hiwatts.
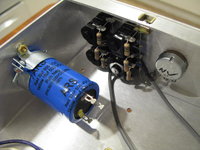
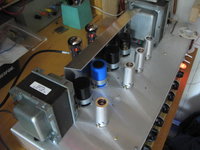
I started the project by assembling the chassis. I installed the tube sockets, transformers, capacitors, the front panel, the pots, and the switches. The chassis is made from 11-gauge aluminum and I also got it from VHR. It included the heat shield that goes between the output tubes and the filter capacitors to help keep the capacitors from getting too warm.
Attachment:
 Custom 50 015.jpg [ 50.62 KiB | Viewed 22329 times ]
Attachment:
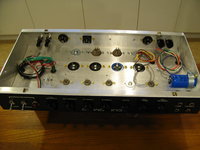 Custom 50 016.jpg [ 48.77 KiB | Viewed 22329 times ]
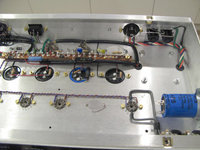
I built the preamp turret board next. The power amp and power supply use another smaller turret board. Some of the wiring in the original Hiwatts runs through plastic tubing to keep it together. You can see tubing on the wires that run from the preamp board to the power amp.
Attachment:
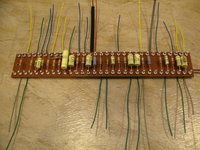 Custom 50 027.jpg [ 65.73 KiB | Viewed 22329 times ]
Attachment:
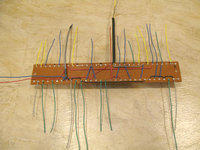 Custom 50 023.jpg [ 101.48 KiB | Viewed 22329 times ]
I went with the method Harry Joyce used for attaching the fly off wires to the board. This put them on the bottom instead of the top. It looks neater, but the danger with this method is the wires can end up being too short if you aren't careful with your measuring.
Wiring the input jacks was next. If space inside the chassis is cramped, a good tip is to temporarily install the jacks on the outside of the chassis while you do the wiring. But I went a bit further and made a little jig to hold them in the proper position instead. This let me rotate the jacks into whatever position I needed to install the resistors and wires and it was easier than moving around a heavy chassis.
Attachment:
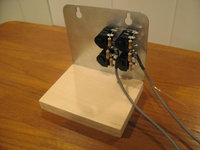 Custom 50 028.jpg [ 38.83 KiB | Viewed 22329 times ]
Attachment:
 Custom 50 037.jpg [ 55.18 KiB | Viewed 22329 times ]
The next step was wiring up the heaters. I did it Hiwatt style where the wires run straight as they pass the tube sockets and are only twisted on runs between the tubes. These twisted runs are short so I just twisted them by hand instead of using a power drill.
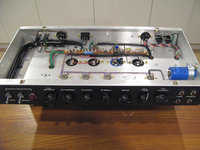
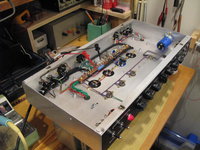
I also assembled the power board, did the AC wiring, and connected the power transformer and the output transformer. More plastic tubing was used to bundle the AC wiring and the primary wires on the output transformer.
Attachment:
 Custom 50 043.jpg [ 90.29 KiB | Viewed 22329 times ]
Attachment:
 Custom 50 044.jpg [ 94.09 KiB | Viewed 22329 times ]
Attachment:
 Custom 50 045.jpg [ 82.96 KiB | Viewed 22329 times ]
Attachment:
 Custom 50 046A.jpg [ 86.54 KiB | Viewed 22329 times ]
Once I had the power supply wired I was able to test the amp for the first time. I checked all my wiring several times and made sure that the polarity of all the diodes and capacitors was right, then I applied power. The pilot light came on and I watched for smoke. I wasn't expecting smoke and there wasn't any. I measured the voltages and my meter showed the B+ was a healthy 481 volts. I also checked the bias supply and the heaters and found them to be OK, too.
Attachment:
 Custom 50 041.jpg [ 69.55 KiB | Viewed 22328 times ]
Next I finished the power amp wiring by installing the resistors for the control grids and screen grids.
Attachment:
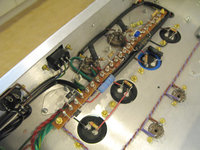 Custom 50 049.jpg [ 107.03 KiB | Viewed 22329 times ]
I installed the preamp board next and wired it to its tubes and the power board.
Attachment:
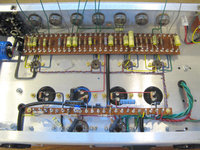 Custom 50 051.jpg [ 132.48 KiB | Viewed 22329 times ]
Then I wired the preamp board to the pots and put in the last of the resistors and capacitors.
Attachment:
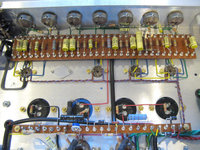 Custom 50 053.jpg [ 138.4 KiB | Viewed 22329 times ]
Attachment:
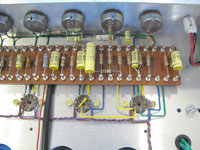 Custom 50 057.jpg [ 115.15 KiB | Viewed 22329 times ]
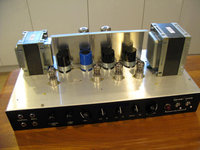
The wiring was now finished and it looks very much like a Hiwatt!
Attachment:
 Custom 50 068.jpg [ 84.32 KiB | Viewed 22329 times ]
Now it was time to test the amp. I checked my wiring very carefully and all was good, so I applied power. It passed the smoke test. It also passed all the voltage checks. I powered it down and waited for the capacitors to discharge, then I plugged in the preamp tubes. I powered it up again and they all glowed normally and all the voltages were still good.
I powered it down and waited for the capacitors to discharge, then I plugged in the two EL34 output tubes and a dummy load. I applied power in the Standby mode. All the tubes glowed normally. It was beginning to look like the amp would work the first time, but when I took it out of Standby, I heard a loud rattling noise coming from the EL34s.
I immediately shut it off. I suspected that the output transformer was wired to the EL34s backwards. In an amp that has negative feedback there is a 50-50 chance of getting this right. If it's wrong the amp turns into an oscillator and if a speaker is attached this makes a "motorboat" or squealing sound. I only had a dummy load attached so I don't know what it sounded like. I only knew that the output tubes weren't happy.
So I reversed the connections from the anodes of the output tubes to the primary of the output transformer. I fired the amp up again and everything was quiet this time. There was still no smoke, no signs of red plating on the EL34s and all the voltages were good. I plugged in a speaker and a guitar for the first time and it worked like a charm! I played it a bit, then shut it off since there were still some things to do to complete the amp.
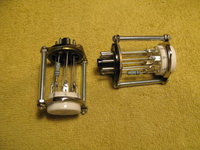
The bias for the output tubes had to be adjusted next. The original Hiwatts don't have built-in bias test points and neither does mine. So I rigged up a couple of "bias probes" using the 8-pin plugs from a couple of old relays, a couple of 8-pin tube sockets and a couple of 1-ohm resistors. These aren't as fancy as the commercially available probes, but they let me measure the cathode current and the anode voltage easily from outside the chassis.
Attachment:
 099.jpg [ 66.66 KiB | Viewed 22328 times ]
Attachment:
 Custom 50 093.jpg [ 116.01 KiB | Viewed 22328 times ]
The bias trimmer was set to minimum resistance and I found that the cathode current was 72mA. There was no red plating, but this was way too high. It's typically around 36mA for EL34s in circuits like this. A detailed description of setting bias is beyond the scope of this post and there are several methods that can be used. So to make a long story short, for each tube I measured the voltage at the anode and the voltage across a 1-ohm resistor in series with the cathode and applied Ohm's law to calculate the cathode current and how much power the tube was using idling. Using a 1-ohm resistor makes the math easier. I ended up setting the bias so the cathode current was 39mA.
Incidentally, I got the tubes from an outfit in Hamilton, Ontario called thetubestore.com. The 12AX7s and 12AT7 are Tung-Sol. The EL34s are SED (Winged C) that I bought as a matched pair. I found that the cathode current was identical on both tubes so they are indeed a matched pair.
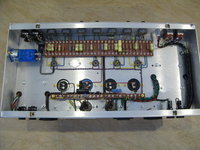
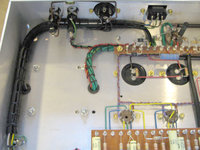
The next thing I did was finish dressing the power wiring. As on the originals, I used real cable lacing. No zip ties for this amp!
Attachment:
 Custom 50 076.jpg [ 63.16 KiB | Viewed 22328 times ]
Attachment:
 Custom 50 078.jpg [ 95.2 KiB | Viewed 22328 times ]
Attachment:
 Custom 50 088.jpg [ 104.32 KiB | Viewed 22328 times ]
I did a "soak test" next. This is where the amp runs for several hours with a dummy load and a sine wave input to make sure everything is stable and continues to work properly. Hiwatt did it, so I figured I should do it too.
Attachment:
 Custom 50 071.jpg [ 51.05 KiB | Viewed 22328 times ]
It passed the soak test. The bias didn't drift, the voltages were still good and there was never any smoke or red plating.
The last thing was to put the amp in its cabinet. I almost hated to do that, though, because it hides the beauty of the chassis and its wiring!
Attachment:
 Custom 50 098.jpg [ 113.34 KiB | Viewed 22328 times ]
Attachment:
 Custom 50 097.jpg [ 71.83 KiB | Viewed 22328 times ]
I wish I could take credit for making that beautiful cabinet, but at the time it was just easier for me to order it from VHR. Since then I have made cabinets like that with Tolex and piping. And no corner brackets needed to hide bad Tolex joins on the compound curves! I have also made several cabinets using hardwood, including the one I made for my Trinity TC-15 using an African wood called padauk.
viewtopic.php?f=1&t=3489&hilit=+two+yearThe amp looks and sounds like a real Hiwatt. It was a lot of fun to build and a real honor to try to emulate the ultra-neat military-spec wiring that Harry Joyce and his company did on the originals. The build took about six weeks, mainly working on the weekends. It could be done quicker but I was in no rush. For me getting the wiring neat on a Hiwatt-inspired amp is almost as important as how it sounds.


