
Page 28 - Triwatt Custom Lead Amp Builder's Guide
P. 28
Install the pilot lamp socket if you haven’t
already.
Tightly twist the two green 6.3 V AC
heater wires from the power transformer.
Connect the two 6.3V AC leads to the
pilot lamp socket terminals.
Connect the Green-Yellow 0V 6.3V
center tapped wire to the “Power”
ground made of 3 #6 lugs connected to
the chassis
Heater Wiring
For the heater wires, the two twisted 20 gauge wires connect to the pilot lamp socket and then to
the terminals of the first Power Tube to pin 2, the other wire to same Power Tube but pin 7. Then
these go to pins 2 and 7 respectively of the second Power Tube. From there, the wires daisy chain
across the preamp tubes, one wire to both pins 4 and 5 of each preamp tube and the other wire to
pin 9. This phasing or ‘polarity’ on the preamp heaters needs to be maintained. The two power
tube sockets also need to have their heaters wired in the same phase (using the same colours) to
reduce hum.
It is important to wire the tube filaments carefully. Use the pre-twisted 20/22 gauge wire to
minimize any hum. Solder each wire to the pilot light assembly. Now route the twisted pair wire
around the outside perimeter of the chassis, following the layout diagram, pressing it flat against
the chassis. Connect the same color heater wire to the same pin(s) as you progress from tube to
tube e.g. Red on pin 2 of both Octal sockets and Black on pins 7. Do one tube socket at a time.
Complete the 12AX7s using the same process. Black on pins 4 & 5 tied together and Red on pins
9. Don’t switch the heater wire polarity.
Once the heater wiring is completed, install the parts from the terminal strips to the
potentiometers or tube sockets.
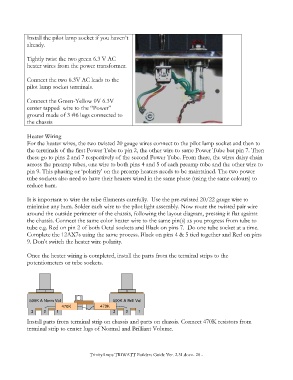
500K A Norm Vol 500K A Brill Vol
1M-A Tone
1M-A Tone
470K 470K
3 2 1 3 2 1
Install parts from terminal strip on chassis and parts on chassis. Connect 470K resistors from
terminal strip to center lugs of Normal and Brilliant Volume.
TrinityAmps TRIWATT Builders Guide Ver. 2.31.docx- 28 -